I just thought I would share my recent experience in setting up a new Best Track. I want to share the issues I ran into and what worked for me.
While the Best Track is a good quality product, I wanted to make it better and ensure that any of my wheels would not get damaged.
I watched Bulldogs video several times and used that as my guide to get started. I think he said it took him about 3-4 hours to sand the entire track, so I planned on about double that. It ended up taking me about 22-23 hours to sand the entire track. This include removing all of the high spots at the joints and "fitting" each joint so it was tight at the surface.
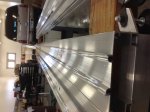
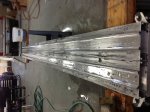
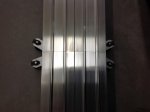
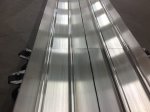
I ran into a QC issue with one of the curved sections (see attached). I contacted Best Track and sent them a picture. They shipped out a replacement right away and it did not end up slowing me down, because I had plenty of other stuff to do. When I spoke to Steve at Best Track, I also ordered extra lane pieces. I felt that the track could stand to be a little stiffer while I was sanding. So I added an extra lane piece in the middle of each section. I feel it really makes the track solid. I still need to order another one as I am going to place it at the top of the start gate to keep everything there even and solid also.
I had some difficulty in getting the joints to fit tight. I used the supplied bit to touch up each dowel location before installing them. I also used the supplied file to dress any burs. I still could not get the sections to draw up tight at the surface. I ended up tapering the end of each section about .015" from the top to the bottom. This allows the top to make contact first and really closed up the gaps. This took a little while to figure out and some time to decide how much material needed to be removed.
I used a block for all of my dry and wet sanding as this allowed me to keep things square and even. I cut some blocks so they fit the lanes and the paper so to maintain a good fit and not unduly waste sandpaper.
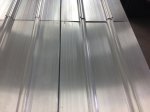
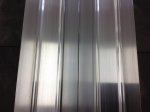
I used a lot of sand paper , both wet and dry. I started at 100 grit and went all the way to 7000, before I polished with Maguires polish. I used 100, 150, 180, 240, 320, 400, 600, & 800 to blend each joint and the transition. The 800 & 1000 covered the entire length of each section. While the track was smooth at this point, I did not like the finish. I wanted to match as closely as possible to the factory Best Track finish.
So, I started wet sanding. I used 1200, 1500, 1800, 2000, 2500, 3000, 5000, & 7000. At each grit, I rinsed the track thoroughly so any remaining course grit would be gone. I also completely washed the track both before and after the 7000 grit. I also used compressed air to dry the track and blow out any abrasive materials that might be trapped between the lanes. I did that several times before I moved to polish. Then I hand applied the polish and went over each lane and guide 4 times. After I was done polishing, I washed everything again and cleaned it a final time with brake cleaner. It took about 4 passes before the paper towel did not have any remaining black residue when wiping the track.
I then used pledge to wipe down the track surface as directed by Best Track. Overall, this was a much bigger project than I anticipated, but I am very pleased with the results. When looking with my jewelers loop at the untouched section of the track and what I sanded, they look alsmost identical under magnification. The sanded/polished section may be a bit less course, but is is close. I wanted to have it close, so that the amount of " bite" that the wheels would have on this track would be close to any other Best Track. I was also VERY concerned about residue abrasive being left in the track, so I probably went above what I need to when washing and cleaning the track.
I still need to apply the lane tape and do the start gate mods. I will say that the sound that the cars make while traveling down the track is sweet!
If I was to do this again, I would start the wet sand a little lower, maybe about 600? I hesitated to use wet paper in the beginning, because I was unsure of the cleanup. I left the track assembled and leveled while sanding thru the 2000 grit. I was confident that the transitions at each joint were fine and that I really was not removing much material at that point. After that I placed each section on sawhorses for the last wet sanding and polishing
I also went to Staples and bought extra binder clips. I am using 4 at each joint instead of 2. I really feel that this helps to close the gaps and keep them tight.
Good luck if you take on this project and I hope that you can learn from my experience.
While the Best Track is a good quality product, I wanted to make it better and ensure that any of my wheels would not get damaged.
I watched Bulldogs video several times and used that as my guide to get started. I think he said it took him about 3-4 hours to sand the entire track, so I planned on about double that. It ended up taking me about 22-23 hours to sand the entire track. This include removing all of the high spots at the joints and "fitting" each joint so it was tight at the surface.
I ran into a QC issue with one of the curved sections (see attached). I contacted Best Track and sent them a picture. They shipped out a replacement right away and it did not end up slowing me down, because I had plenty of other stuff to do. When I spoke to Steve at Best Track, I also ordered extra lane pieces. I felt that the track could stand to be a little stiffer while I was sanding. So I added an extra lane piece in the middle of each section. I feel it really makes the track solid. I still need to order another one as I am going to place it at the top of the start gate to keep everything there even and solid also.
I had some difficulty in getting the joints to fit tight. I used the supplied bit to touch up each dowel location before installing them. I also used the supplied file to dress any burs. I still could not get the sections to draw up tight at the surface. I ended up tapering the end of each section about .015" from the top to the bottom. This allows the top to make contact first and really closed up the gaps. This took a little while to figure out and some time to decide how much material needed to be removed.
I used a block for all of my dry and wet sanding as this allowed me to keep things square and even. I cut some blocks so they fit the lanes and the paper so to maintain a good fit and not unduly waste sandpaper.
I used a lot of sand paper , both wet and dry. I started at 100 grit and went all the way to 7000, before I polished with Maguires polish. I used 100, 150, 180, 240, 320, 400, 600, & 800 to blend each joint and the transition. The 800 & 1000 covered the entire length of each section. While the track was smooth at this point, I did not like the finish. I wanted to match as closely as possible to the factory Best Track finish.
So, I started wet sanding. I used 1200, 1500, 1800, 2000, 2500, 3000, 5000, & 7000. At each grit, I rinsed the track thoroughly so any remaining course grit would be gone. I also completely washed the track both before and after the 7000 grit. I also used compressed air to dry the track and blow out any abrasive materials that might be trapped between the lanes. I did that several times before I moved to polish. Then I hand applied the polish and went over each lane and guide 4 times. After I was done polishing, I washed everything again and cleaned it a final time with brake cleaner. It took about 4 passes before the paper towel did not have any remaining black residue when wiping the track.
I then used pledge to wipe down the track surface as directed by Best Track. Overall, this was a much bigger project than I anticipated, but I am very pleased with the results. When looking with my jewelers loop at the untouched section of the track and what I sanded, they look alsmost identical under magnification. The sanded/polished section may be a bit less course, but is is close. I wanted to have it close, so that the amount of " bite" that the wheels would have on this track would be close to any other Best Track. I was also VERY concerned about residue abrasive being left in the track, so I probably went above what I need to when washing and cleaning the track.
I still need to apply the lane tape and do the start gate mods. I will say that the sound that the cars make while traveling down the track is sweet!
If I was to do this again, I would start the wet sand a little lower, maybe about 600? I hesitated to use wet paper in the beginning, because I was unsure of the cleanup. I left the track assembled and leveled while sanding thru the 2000 grit. I was confident that the transitions at each joint were fine and that I really was not removing much material at that point. After that I placed each section on sawhorses for the last wet sanding and polishing
I also went to Staples and bought extra binder clips. I am using 4 at each joint instead of 2. I really feel that this helps to close the gaps and keep them tight.
Good luck if you take on this project and I hope that you can learn from my experience.
Attachments
Last edited:


")

")