2021 Awana Grand Prix Goals/Self Challenge

Feb 23, 2014
39
36
18
11
Allendale, Michigan
I have created a little challenge for myself this year since my church Awana Grand Prix and the Michigan Awana Grand Prix State Championship races are both cancelled for 2021. I figured I would create this thread for anyone who would like to follow along. I plan on posting some pictures throughout the process and of course the results.

2021 Awana Grand Prix Goals/Self Challenge
  1. Beat personal best 2020 State Race time: 2.5056 sec.
  2. Beat personal 2020 State Race Avg. time: 2.5119 sec. -based on two passes down each lane, worst time dropped.
  3. Maintain personal 2020 State Race Std Dev: 0.0032 or lower
  4. Beat the fastest 2020 State Race time: 2.4991 sec.
  5. Beat the best 2020 State Race Avg. time: 2.5038 sec. -based on two passes down each lane, worst time dropped.
-I am planning on building two cars one with fenders and one without.
-I will be doing this on a 32 ft. Besttrack with Champ Timer, the same track used for the 2020 State Race.
 
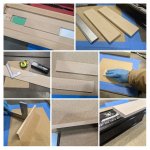
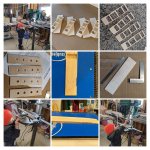
-I got two bodies cut and squared up tonight, here is how I do it.
  1. Started with 5/16" thick basswood and cut the bodies to rough size.
  2. Flatten the bottom of the body: draw lines across the entire bottom of the body and sand until lines are gone. I tape sand paper down to my table saw to do this. Do not push down while sanding, you want to sand the bottom flat not push it flat.
  3. Square one edge with the bottom: I support the body with the flat sanded bottom against a square while sanding the edge. Again I draw lines down the entire edge and sand till they are gone.
  4. Square the remaining edge and check width: Sand the second edge just like the first but be sure you are also checking your finished width. I also check the fit of each body in The Block and in my body jig.
-Ready to layout some pockets and axle holes.

20210216_223728-COLLAGE.jpg
 
  • Like
Reactions: DerbyBoyz
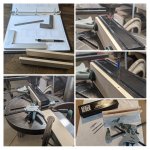
Axle holes are drilled:
-I used The Block and #43 drill bits
-Rear axle holes are drilled at a 3 deg. angle, 1/8" up from the bottom of the body.
-Front axle holes are drilled straight, 3/16" up from the bottom of the body.
-The rear axle holes are drilled as far back as possible so the wheels are flush with the rear of the body.
-4-1/2" wheel base.
-The dominate front axle will be bent for steer, this will also cause the other front wheel to be raised off the track.
20210217_145712-COLLAGE.jpg
 
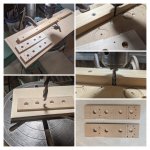
Drill Press Work is Complete:
-Drilled router plunge holes for cutting out pockets with router.
-Drilled 1/8" holes in corners of weight pockets.
-Drilled 1/8" holes for axle glue holes, 1/2" in from side of body.
-Cut 1/16" deep notch from dominate front side of car for dominate front wheel. Used router bit on drill press to do this.

PXL_20210218_022545839-COLLAGE.jpg
 
Last edited:
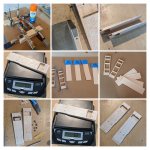
Lots of Body Work:
-Laid out the body on each car blank.
-Used my router and body pocket fixture to remove the unwanted material from the body.
-Laid out the side profile on the car bodies (making sure to check thickness with tungsten cubes).
-I built a new fixture to hold the cars while sanding the profiles and used two sided tape to hold the car bodies on the fixture.
-Sanded the top and bottom of both bodies verifying thickness and depth of weight pockets with tungsten cubes throughout the process.
-The finished product is 2 frames that weigh just 5 grams each.

PXL_20210218_160050092-COLLAGE.jpg
 
Nice work, CV! The bodies look really good!

I like the idea of that sanding jig. Over the years, my cars have turned into airplanes on a few occasions. When they fly that soon, they don't usually fly down the track.

Good job!

Thank you, Mojo, and I know what you mean by sending them flying early. There is just to much time into making these to risk it and the jig worked great.
 
Finish Body prep:
-Glued 3/32” Balsa veneer to top and bottom of car bodies.
-Sanded veneer flush with sides of car bodies.
-Fit tungsten into rear weight pocket formed by the veneer.
-Sanded top and bottom of car to finished profile.
-removed veneer from bottom of car to access forward weight pocket.
-One body now weighs 7.1 grams and the other weighs 6.8 grams.
PXL_20210221_140948816-COLLAGE.jpg
*Onto the fenders*
 
  • Like
Reactions: Jimmy & his 2 Kids
Update:
Yes, I started over because I was not happy with what I had. One main thing with pinewood derby is if you haven't built a car in awhile there is a re-learning curve. After building the first two car bodies I knew I could make them better just because of what I had learned in the process, and by tightening things us a bit.
-These bodies were 5.0-5.5 grams without skins.
-With skins they are 6.9-7.8 grams.
-I also had some expert help with the drill work on these which I am sure made all the difference.

PXL_20210303_151816932-COLLAGE.jpg
 
Not much progress but a little update:
I fought like crazy to get good clean holes through my balsa fenders. so the method I settled on was to drill an 1-1/8" hole with a forstner bit, then I used a piece of pipe with sandpaper on it to clean up the holes and get them to the size I wanted for now.

-Step 1: Cut fender blanks from balsa wood.
-Step 2: Layout holes on blanks to match wheelbase on cars.
-Step 3: Drilled holes with 1-1/8" forstner bit.
-Step 4: Using pipe with sandpaper on it, sand holes to clean up drill and bring to desired size.
-Step 5: With wheels on car, glue and clamp fenders onto car bodies. I use a straight axle in the DFW position while doing this.

-The next step is to shape the fenders. I have not decided on if they will both be 3X style or if one will have a straight/solid middle fender. Fender style at NPWDRL seems to be a 50/50 mix of the two styles.

PXL_20210310_151315043-COLLAGE.jpg
 
Make sure you leave room for the offset that the canted front & rear axles will have.
Yes I have built more than 1 car & gone to put the wheels on or tune the front & the wheels don;t fit the hole
1 1/8" hole saw. :)

Post the results good or bad, Good Luck
Jup
 
  • Like
Reactions: CVRacing
Make sure you leave room for the offset that the canted front & rear axles will have.
Yes I have built more than 1 car & gone to put the wheels on or tune the front & the wheels don;t fit the hole
1 1/8" hole saw. :)

Post the results good or bad, Good Luck
Jup

Thank you, Jupiter 2.9. I plan to gap the fenders next and then start shaping them. I will post the results for sure, possibly even some video of the runs.
 
  • Like
Reactions: Loud2ns
-Sand, Sand, Sand, Cut, Cut, Cut, Then Sand, Sand, Sand = Fenders
I settled on 3X style fenders on both cars. Lots of work but the second one was definitely easier to do then the first.
-Step 1: Sand the fender blanks closer to finished size.
-Step 2: Layout the X lines on the side of each fender and sand the side profile to rough shape.
-Step 3: Layout the X lines on the top and bottom sides of each fender and sand to rough shape.
-Step 4: Using a utility knife remove the material from the inside, top and bottom of each fender.
-Step 5: Sand everything by hand to finish size and shape.
-Step 6: Verify clearance around the wheels and on the bottom side of the car so the fenders don't rub the track.
Most of these steps are completed with the wheels on the car so you can visualize the fit as you work.
-One car now weighs 11.1 grams, the other is 12.9 grams.

PXL_20210316_020619519-COLLAGE.jpg
 
  • Like
Reactions: T-Bone Racing
-Sand, Sand, Sand, Cut, Cut, Cut, Then Sand, Sand, Sand = Fenders
I settled on 3X style fenders on both cars. Lots of work but the second one was definitely easier to do then the first.
-Step 1: Sand the fender blanks closer to finished size.
-Step 2: Layout the X lines on the side of each fender and sand the side profile to rough shape.
-Step 3: Layout the X lines on the top and bottom sides of each fender and sand to rough shape.
-Step 4: Using a utility knife remove the material from the inside, top and bottom of each fender.
-Step 5: Sand everything by hand to finish size and shape.
-Step 6: Verify clearance around the wheels and on the bottom side of the car so the fenders don't rub the track.
Most of these steps are completed with the wheels on the car so you can visualize the fit as you work.
-One car now weighs 11.1 grams, the other is 12.9 grams.

View attachment 1977
Those look awesome! Great job!
 
  • Like
Reactions: CVRacing
Lots of things coming together:

1. Painted the fenders with white glue.
2. Sprayed the fenders with sealer.
3. Colored the sides of the car with sharpie marker.
4. Painted sides of the car around axle locations with nail polish.
5. Installed tungsten weight in rear of cars.
6. Created and attached top coverings.
7. Created inside and outside air shields for NDFW.
8. Installed NDFW onto cars with air shields.

-Been working on and off on wheel and axle prep as well.

20210402_184432-COLLAGE.jpg
 
CV you need a copyright & a publisher. Maybe a screen play
Best step by step I’ve seen & with illustrations.
Thanks for the extra effort. I hope they role
Jup.
 
  • Like
Reactions: CVRacing