I plan to drill axle holes this year, but I wanted to know how you adjust the steer on the car then to create a rail rider. I'm not sure drilling at the correct angle is a good plan so I'm counting on there being some adjustment, but without bending the axles, I am having trouble visualizing the proper adjustment without just kind of forcing the axle a little in the direction I want it to steer and then fixing it somehow in place once I get it there. I plan to drill it with the wheel angled for the cant, but not for the steer. Any input here is appreciated.
How to Steer Drilled Axle Holes
- Thread starter Patrick J Connolly
- Start date
You are using an out of date browser. It may not display this or other websites correctly.
You should upgrade or use an alternative browser.
You should upgrade or use an alternative browser.
You can drill the hole with the cant and a bit of toe in (slanted toward the front of the car). I'm guessing your rules don't allow for bending axles? If this is the case it is unlikely that all of the axles in your kit are straight. Figure out which one is the least straight and use that one for the steer wheel. Twist it a bit at a time until you get the steer you want.
Can you bend the axle?I plan to drill axle holes this year, but I wanted to know how you adjust the steer on the car then to create a rail rider. I'm not sure drilling at the correct angle is a good plan so I'm counting on there being some adjustment, but without bending the axles, I am having trouble visualizing the proper adjustment without just kind of forcing the axle a little in the direction I want it to steer and then fixing it somehow in place once I get it there. I plan to drill it with the wheel angled for the cant, but not for the steer. Any input here is appreciated.
I can bend the axle. Sure. What is the preferred method? Drill it straight and bend it? If so, what angle should it be bend to?Can you bend the axle?
We drill ours straight and bend the axle 3 degrees. I've seen some put more bend in, but the more bend you have, the more touchy the car will be when trying to adjust the steer of the car.
Last edited:
I would put more than a 3 degree bend in the front axle if it was me.

I agree 3 degrees is not enough. I think I started bending my steering axles about 5 degrees and since have increased that from input from this awesome forum. The greatest challenge is to try to measure your axle angles. I have a very nice bender but it doesn't tell me my finished angle. Peter Drucker once said " Ultimately it's not about who's right or who's wrong, it's about what works". I would encourage you to try different axle bends to see what work's best for you. And I would love for someone to invent and market an axle angle indicator. I would buy it for sure. ")
Yep, I have one but the little rascals (axles) are still not easy to measure to the exact degree of angle. Having fun adjusting my bender to get measurable increments. Still loads of fun for me and many things to discuss with the boys on their cars.
Yep, I have one but the little rascals (axles) are still not easy to measure to the exact degree of angle. Having fun adjusting my bender to get measurable increments. Still loads of fun for me and many things to discuss with the boys on their cars.
You could use a laser level to create a massively larger version of the identical angle on the wall and then measure that.
Sorry it took so long to post this. I needed to dig thru a bunch of PWD paperwork to find it.
Maybe this will help ....this is something I found online (picture #1)and then added to it. I simply took the largest protractor that we had around the house and marked it out. I then drew out the lines toward the edge of the paper. I figured that would help me see if the spaces further out toward the edge of the paper appear to look even. I also used 4x magnification while marking this out with a very sharp pencil.
REMEMBER, that it is not the exact bend angle that is needed. For instance, you just want to know that you have close to a 6* and not 4* bend. This sheet helps with that. I believe I can get within a degree most of the time. In fact, using 4x magnification, I feel I can normally get it down to around a half degree. It does take time to move the axle around on the lines and to go back and forth. But it is surprising how accurate it can be.
Again, if you want 5 *, and you end up with 6*, you most likely will not be able to tell the difference unless you do a significant amount of track testing and tuning. This should help you to get it close.
I originally left space to put the half degree marks in between, but found that I really didn't need them.
I hope this helps!
I drill everything. building Awana cars requires some slight changes and it's easier to use an angle gauge and my machinist vice with my drill press than trying to bend an axle IMHO. A machinist friend made me a jig that lets me do the rears too. Tuning grooves in the axle heads are still a must but I don't wreck any axles trying to get them bent. Probably not "optimal" but my granddaughter takes 1st or 2nd at regionals every year so that's good enough.
PLEASE ADVISE:
It was my understanding that the general recommendation was that the two rear axles should not be bent, but the rear axle holes should be at 3 degrees. Like this: /===\
The front dominant axle hole should be drilled in straight, but the axle should be bent. I thought at 3 degrees (b/c that’s how DD4H sells them), but sounds like you guys think that’s not enough. The side of this wheel should be 1/16” closer and the bent axle should be pointing up, like this. |===\
The other front wheel should be raised so it doesn’t touch, and the axle pushed all the way in so the wheel doesn’t spin. It shouldn’t have a bent axle or cant.
Assuming the rules allow, is this correct?
PLEASE ADVISE:
It was my understanding that the general recommendation was that the two rear axles should not be bent, but the rear axle holes should be at 3 degrees. Like this: /===\
The front dominant axle hole should be drilled in straight, but the axle should be bent. I thought at 3 degrees (b/c that’s how DD4H sells them), but sounds like you guys think that’s not enough. The side of this wheel should be 1/16” closer and the bent axle should be pointing up, like this. |===\
The other front wheel should be raised so it doesn’t touch, and the axle pushed all the way in so the wheel doesn’t spin. It shouldn’t have a bent axle or cant.
Assuming the rules allow, is this correct?
Simply put, yes!
You got this figured out. I would add if you bend the DFW 4-5 degrees and install it as you have stated, you will not need to raise the drill on the NDFW. This is because it will get "lifted" when you rotate the DFW down to set the steer. This concept took me a while to grasp, but it does work!
The amount of bend has and is something that each builder has a preference for. How they weight the car, how much offset and the quality of the drill all have an impact on how much to bend the front axle. Know this, the more bend you have the more difficult it becomes to set the steer. This is because turning the axle a very tiny amount can change the steer 2" -3" easily. Most bend between 5 & 9 degrees. You also need to be careful when approaching the 9 degree mark. With this much bend the clearance to pass the axle through the bore without causing damage starts to come into play.
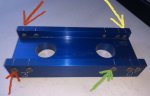
I attached a photo to illustrate. I used the SBE. I used the red arrows for the back, with straight axles. I used the yellow for the DFW with a bent axle. I used the green arrow for the NDFW, but it sounds like I should’ve just left the block in place and used the hole directly across from the yellow arrow for the NDFW. Is that correct?
For the money I spent on that thing, it sure would be nice to know how to use it!
I really appreciate your help!
Attachments
I attached a photo to illustrate. I used the SBE. I used the red arrows for the back, with straight axles. I used the yellow for the DFW with a bent axle. I used the green arrow for the NDFW, but it sounds like I should’ve just left the block in place and used the hole directly across from the yellow arrow for the NDFW. Is that correct?
For the money I spent on that thing, it sure would be nice to know how to use it!
I really appreciate your help!
Prozach,
Don't take this wrong, but most beginner builders don't shell out the money for a SBE. Most work their way through various levels before stepping up to a top level drill jig. So most have an understanding of what they want to do.
There will be nothing wrong with drilling the NDFW raised. It might, I say might, cost you a few ten thousands of a second because of the added aero drag? This is NOT noticeable on almost ALL Cub Scout races.
One thing I want to ask, is how you positioned your block in the SBE? Ideally, if your rules allow, your rear axle should be centered at 0.625" from the back of the car.
I would encourage you to read as much as possible here. There is a TON of great information on this forum. By reading, then reading some more, and then even reading more yet, you will answer a lot of questions that you have. You will also learn stuff that you didn't even know to ask or think about!!! Be careful, as you can get sucked into a rabbit hole and spend countless hours learning about these little cars!
") The key is that you will be learning and understanding how to build a faster car.
The key is that you will be learning and understanding how to build a faster car.Prozach,
Don't take this wrong, but most beginner builders don't shell out the money for a SBE. Most work their way through various levels before stepping up to a top level drill jig. So most have an understanding of what they want to do.
There will be nothing wrong with drilling the NDFW raised. It might, I say might, cost you a few ten thousands of a second because of the added aero drag? This is NOT noticeable on almost ALL Cub Scout races.
One thing I want to ask, is how you positioned your block in the SBE? Ideally, if your rules allow, your rear axle should be centered at 0.625" from the back of the car.
I would encourage you to read as much as possible here. There is a TON of great information on this forum. By reading, then reading some more, and then even reading more yet, you will answer a lot of questions that you have. You will also learn stuff that you didn't even know to ask or think about!!! Be careful, as you can get sucked into a rabbit hole and spend countless hours learning about these little cars!
I hear you on the drill jig. Given the age of my kids, I’ll probably be building these cars for about 7 more years. The way I see it, the sooner I bought the jig, the more times I’ll get to use it.
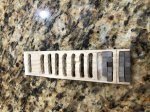
I put the rear axle wheel 5/8” from the rear. Here’s a picture of the last one I did.
Attachments
I hear you on the drill jig. Given the age of my kids, I’ll probably be building these cars for about 7 more years. The way I see it, the sooner I bought the jig, the more times I’ll get to use it.
I put the rear axle wheel 5/8” from the rear. Here’s a picture of the last one I did.
Someone has been visiting 5 Kids site. He has a great site to start to learn from! I reference it in all of my Cubscout workshops. If the kids are interested, I hope at some point the parent finds there way here.
5Kids is a great place to start as all of the fundamentals are valid. Some of the designs are a bit dated, but if you follow his advice, you can build a fast car.
You nailed it. Last year, we didn’t own a single tool. I brought the template from 5kidsracing to the Cub Scout build, followed the instructions the best that I could in the time we had, and placed 1st in pack and 2nd in council.
This year, we bought the jig, drill press, scroll saw, and some other basic tools. We entered two cars following the 5kidsracing ladder body (from the picture). They were the 1st and 2nd fastest in the pack. We won’t be able to go to council b/c of a vacation.
Next, we hope to build a few cars following the advice we’ve picked up on here. I think we’ll try to follow the instructions on spacewalker’s video for ultra light ladders. I think we’ll use the DD4H fenders. If the cars come out ok, we’ll test the waters with some league racing.
Get yourself a 1/4" end mill bit and try that in your drill press for cutting weight pockets. That and a magnetic type base/fence works wonders. If you are going to cut all the way through the bodies, a scroll saw works well. Again from what I can see, you are on the right path. Keep reading and learning. Make sure to teach your kids what you are learning, both the what and why are equally important. Teaching them these things along with time spent with them is precious. Remember to enjoy the ride! Good Luck!
Similar threads
- Replies
- 3
- Views
- 232
- Replies
- 4
- Views
- 903
- Replies
- 20
- Views
- 3K